Useful Daily Eyebrow Tutorial For Beginners

How to trim eyebrows?

This is the easiest eyebrow trimming tutorial. I used this tutorial picture when I first trimmed my eyebrows.
Today, we will learn the detailed eyebrow trimming methods together.

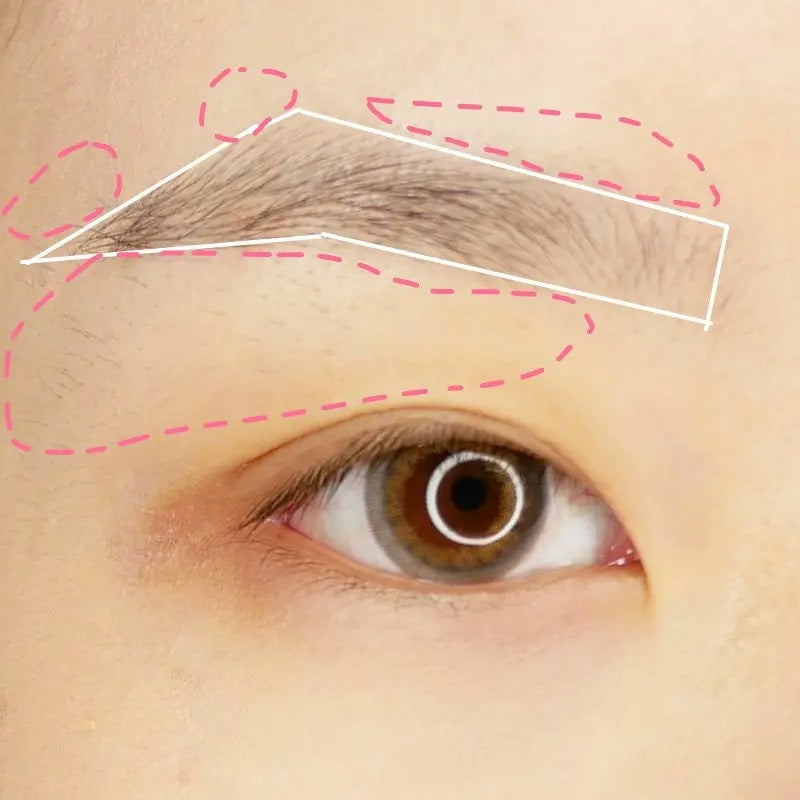
1. Determine the position of the brow, brow peak and brow tail according to the three-point positioning:
Brow: the middle of the nose and the vertical position of the brow
Eyebrow peak: outside of the nose-pupil-eyebrow peak
Eyebrow tail: outer side of nose-corner of eye-eyebrow tail
Connect the dots to the dots to form a box:
Draw a sketch map scribbled for everyone to see, and all parts outside the frame must be repaired. Novices suggest that the frame should be larger, so that the eyebrows will not be trimmed too much at once.
2 After the draft is finished, the eyebrows will be formally trimmed!

Eyebrow trimming steps:
1. Position the picture frame at three points.
2. At the position of the eyebrow peak of the eyebrow knife, hold the eyebrow trimmer and scrape straight down. It is recommended to start from a position farther away from the line you draw, so that there is a buffer, and scrape vertically until it is almost away from the frame.
3. From the peak of the eyebrow to the end of the eyebrow, tilt the blade and scrape straight from the periphery to the edge of the frame.
4. The lower part of the eyebrows is also shaved vertically along the frame. Generally speaking, because the lower part of the eyebrows is not flat, it can not be done with a few vertical strokes like the upper part. Here you can use the first half of the eyebrow trimmer to shave several times.
5. Scrape the lower part of the eyebrows diagonally downwards. This depends on personal preference. For example, if the eyebrows are narrower, you can shave more appropriately, or if you want a slender eyebrow, you can also raise it.
6. Use tweezers to remove some small spikes and unshaved hairs.
If the eyebrows are not very thick, in fact 1-6 steps are over. Personally, my eyebrows are relatively thick (some of them are inexplicably long), and I will use small scissors to shorten them. This will make the eyebrows easier to draw.
7. Use a spiral brush to brush up the brow part vertically, and cut off the extra part with small scissors.
8. Brush diagonally upward from the middle of the eyebrows to the peak of the eyebrows, and cut off the extra parts with small scissors.
9. Brush diagonally upward from the peak of the eyebrow to the end of the eyebrow, and cut off the extra part with small scissors.
10. Brush diagonally downward from the peak of the eyebrow to the end of the eyebrow, and cut off the extra part with small scissors.
11. Take off the spiral brush, look for the excess bristles, and cut them flat.
12. Finished!

It’s usually a complete repair once, and then it’s easy to do small repairs quickly, which is very trouble-free. In fact, my before photos don't have much to be overhauled, and the contrast may not be so obvious.
How to draw eyebrows?
After finishing a natural and clean eyebrow, you will find that it will be easier to draw your eyebrows. I will demonstrate the most basic natural eyebrow shape below. As long as the natural eyebrow shape is mastered, other eyebrow shapes can be easily adapted.

The eyebrow tools I use here are a machete eyebrow pencil (light color), a thin-headed eyebrow pencil (dark color), and an eyebrow cream. Why use two eyebrow pencils? The biggest problem with my usual eyebrows is the aging of the eyebrows, and I like to draw the longer eyebrows with the natural color of the black hair.
I always feel that the tail is too light and clean. Later, I accidentally watched a beauty show and got the technique of using two eyebrow pencils to draw the eyebrows. I used a machete to draw the eyebrows normally, and then painted the end of the eyebrows again with a darker color. The whole connection is very natural. After applying eyebrow cream, the color will not fade easily.
 Drawing steps:
1. As with the eyebrow trimming steps, draw a light frame after the three-point positioning. The frame here needs to be more detailed, it can't be as hastily as the eyebrow trimming.
2. Skip the eyebrows, start from a little bit before the middle section, use the machete eyebrow pencil to fill the color, pay attention to holding the pen at an angle, like a machete, actually facing the inclined surface, if it is a pen-like or thin head, don't The 90-degree drawing method, every time I see my friends around me raising my eyebrows like this, I think "this must be the rhythm of the end". And the writing must be light, it must be light, it must be light! Imagine the feeling of letting the eyebrow pencil flick over the flow of hair. You can draw natural eyebrows only a few times, otherwise you will not be far from Xiaoxin.
3. Extend to the end of the eyebrows, which can be lengthened appropriately according to eye makeup.
4. Swipe the brows, I personally like the light brows and heavy tails, which looks more natural.
5. Use a spiral brush to brush from the brow to the end to make the color more even. This step may seem simple, but it must not be less.
6-7. Use a darker, thin-headed eyebrow pencil to focus on the part from the peak to the end of the eyebrow.
8-9. Use a lighter eyebrow cream to brush from the brow to the end of the brow. This step varies from person to person and is not necessary. My hair color is heavier and my hair color is lighter, so I use some eyebrow cream, and I found that the eyebrows are not easy to fall off after applying the eyebrow cream, which is much more useful than those eyebrow raincoats.
10. Done

Well, the tutorials on eyebrow trimming and drawing are basically over. They are relatively entry-level.
Once you have tried a few times and practiced more, you can finish the manuscript!


Comments